Gday all, what I have tried to do here is put together some information for people starting to get into landscape photography by writing done some of the things I have learned and how I go about taking my photos etc. This thread is intended that other people will also contribute their hints and tips to provide a comprehensive photography thread on taking landscape photos. Please feel free to correct me if I have made and wrong assumptions/statements (which I’m sure I will have somewhere along the line!). I hope that a few people will be able to get something out of this and that it generally makes sense.
Equipment:
Making good choices with what gear you get can save lots of money and time in the long run, so when buying new gear make sure you do your research and talk to other people about what gear they have and what things they have found useful, and remember just because it was good for another person it may not suite your needs, so find out what sort of stuff they use and what they use it for.
A good landscape photography kit may include most of the following items:
- Good sturdy tripod with a solid head, just about any tripod is better than no tripod at all, but for bushwalking a sturdy but light weight tripod will be essential;
- Remote switch/cable release (essential for bulb exposures, and normal exposures with tripods to minimise camera vibrations)
- Polarising Filter (particularly for stream/river/rainforest photography)
- Graduated Neutral Density Filters (GND), these form a very important part in taking landscape photos especially at sunset and sunrise to even out the contrast between bight sky and dark land.
- Some way of carrying you gear. There are many different styles and sizes of bags, so doing your research to see what will suite your needs is important.
- An umbrella or waterproof coat for your camera is also handy at times, or you can just use your hand or similar.
- I always keep some silicone moisture absorbers sachets in the bottom of my bag to take up any moister.
- Some form of cleaning kit is also essential, as when out taking photos, you will be constantly needing to clean filters, camera and lenses etc.
My equipment:
Camera: Canon EOS 5D
Lenses: Canon 17-40mm f/4 L and 70-200m f/4 L IS (just need a macro now!)
Tripod: Slick, ball head (cheap and light weight, but reasonably sturdy)
Other accessories:
- Canon remote release cable
- Hoya HD CPL and Hoya CPL
- Hoya UV Filter
- Singh-Ray GND in 2 stop hard, 3 stop soft and 3 stop reverse
- Cokin Pro Z GND filter holder and 77mm adaptor ring
- 3X batteries (non-canon brand batteries can often have much higher mAh ratings meaning they will not go flat as quick, but may not have as long a life span).
- 4Gb and 8 Gb Sandisk Extreme IV CF cards
- Lowepro Toploader AW 75
- Small Cleaning kit with rocket blower, brush, cleaning fluid and cleaning tissue paper.
This unfortunately adds up to about 4.5-5.0kgs of camera gear that must carried when bushwalking, so there is a downside to having all this equipment, but it does allow for higher quality photos and more flexibility especially in low light conditions. In the end it comes down to how much you want to spend on equipment, what type of photography you like best e.g. macro, big landscapes, sunrise/sets etc and how much gear you want to carry with you. Good results can still be obtained from many point and shoot cameras but their functionality and performance in blowing up prints is diminished when compared to an SLRs or DSLRs.
Camera settings:
- I always use manual mode but Av mode may be easier for some when starting out, in time you will get a feel for how ISO, aperture and shutter speed inter-relate and then manual mode can become second nature and make it quick and easy to set up, letting you decide how each variable is set.
- ISO is generally set to the lowest setting possible (i.e. 50 or 100) this is to a) reduce noise which becomes an issue with longer shutter speeds and, b) it reduces the sensors sensitivity to light, requiring more light than higher ISOs i.e. a longer shutter speed is then needed than with a higher ISO.
- Aperture is usually set between f/11 and f/22 (usually f/16 or f/18 these days) to give the greatest depth of field and to give longer shutter speeds, however, setting the aperture to f/22 can result in a minor loss of image quality, and it would be mostly recommended to stick between the f/11 and f/18 range for the best results. When shooting without a tripod it may mean that you will need a wider aperture i.e. a lower number say f/7 or f/8 etc, and this aperture may be quite suitable depending on your subject, and this will always be dependant on the available light.
- Shutter speeds are the most variable settings and will vary significantly depending on light, subject, lens used and camera settings. For long shutter speeds, the time may vary from ½ second right up to 5 mins an hour or so after sunset, or even an hour when doing star trails.
- As a general rule the shutter speed will need to be above a certain speed when hand holding to stop camera shake or excessive softness, this can be related to the focal length being used. For example at 200mm without image stabilisation (IS) I would need a shutter speed of 1/200th of a second, preferable a little more depending on how steady you can hold the camera, at 70mm I would need a minimum shutter speed of around 1/70th of a second and so on, this ensures that your images should still be reasonably sharp and not soft or blurred, but where possible always use a tripod, this is where IS can be very handy in allowing shutter speeds of up to approximately 4 stops slower than would be needed on a non-IS lens.
- It is a good idea to download an EXIF viewer such as Opanda IEXIF which can be downloaded from (http://www.opanda.com/) this will allow you to right click on photos and view the EXIF data recorded i.e. camera model, shutter speed, aperture, ISO, lens used, focal length, flashed used etc, dependant on what information their camera has recorded and if the data has been left intact as many people or their software strips this data out unfortunately.
- Note I will give examples using photos showing the settings used etc throughout. As I know that I certainly learn better by seeing rather than reading. Tv stands for the shutter speed in seconds and Av stands for the aperture i.e. f/7, f/11, f/22 etc.
Focusing/Hyperfocal Distance:
- It’s good to have at least a basic understanding of hyperfocal distance and how these can be used to obtain a large or small depth of field (DoF). Hyperfocal distance is the distance at which you must focus to obtain the greatest depth of field (i.e. to achieve acceptable sharpness in as much of the photo as possible) for a given focal length and aperture, generally for landscapes you will want the largest DoF possible, but there will be circumstances where a very small DoF will be wanted (e.g. where you want a subject to be sharply in focus but the background blurred etc). To obtain good Dof, using manual focus can have many benefits. As you can set the DoF that you want to obtain. However, manual focusing is not always practical and depends on the lens used, as many kit lenses tend to have very poor manual focus ability, or marking on the lens barrel and can be quite hard to use effectively, where as more expensive lenses will usually have better markings making it easier to set your focus to a given distance. Manual focusing also becomes very important in long shutter speeds as in low light conditions the auto focus in the camera will have a lot of trouble focusing and tends to just lock on to anything it can, meaning that you could end up with an out of focus image because it has focused near infinity. One way of avoiding this in low light is to get the camera to auto focus where you want and then switch it over to manual focus thus maintaining that focus distance for any subsequent shots taken.
I have only provided a couple of examples highlighting the use of a shallow depth of field to isolate subjects, and not for the use of large depth of fields as most of the other photos on here have utilised large depth of fields.

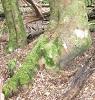
1. With this one I wanted to isolate the subject (the fungi) and make the background partially out of focus, with this one I didn’t want the background so out of focus that you couldn’t make any features out so a small aperture was used to retain some background details, but the focus was placed very close (on the front fungi) so that the background was slightly out of focus. Conversely I could have used a much wider aperture such as f/5-6 etc to achieve a very out of focus background. Tv = 20 seconds, Av = f/18, ISO = 50.

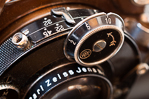
2. In this one I really wanted to isolate the fungi so a wider aperture was used making sure that the background was quite out of focus (note that this was taken with the 18-55mm kit lens for the Canon 400D, as was the below shot too. It just goes to show you don’t have to have a macro lens to get macro type shots). Tv = ¼ of a second, Av = f/6.3, ISO = 100.

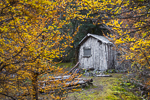
3. Again a small aperture was used, but the focus is on the wrong spot as the out of focus yellow leaves are a distraction where as it would have been better to have them all in focus or the front leave in focus and the back leave out of focus. Tv = 1/40th of a second, Av = f/5.6, ISO = 800.
Compositions:
- I tend to place a big emphasis on foreground compositions in my photos, but many other people like to focus on the sky, and there is no hard and fast rule as to how to compose your shots, however there are a number of things that combine to make strong and pleasing compositions.
- A good rule to keep in mind is the rule of thirds, imagine breaking the picture into thirds both vertically and horizontally, the idea is to have points of interest where each vertical and horizontal line intersect, this will often result in a good composition, this is only a guide and it is best to use your intuition to determine a good composition, chances are if you see something pleasing in a composition then other people will also.
- Horizons should always be straightened and any distortion corrected, as this is often a major flaw in many good photos, however, there is always exceptions to the rule but generally straight horizons are important in landscape photography.
- Also thinking about the rule of thirds, something I would definitely recommend is that horizons should generally not be in the middle, but there are always exceptions e.g. a reflection on a lake or river can often work well with the “horizon” in the middle, but generally they don’t make pleasing compositions.
- Leading lines are another point to remember, I tend to find a strong foreground object and position the land (or other object) in the frame so that the eye is gently drawn along a path through the photo, too many distractions in a photo makes the eyes jump all round the place and doesn’t work very well.
- A very important thing when composing shots is to be able to anticipate what the light is doing, how this will affect your subject and how best to capture it in the way you want to portray it, so always keep an eye out behind you as often great but short lived lighting can be missed as the photographer is too focused on looking in the one direction.
- Often the good compositions will require you to get wet, cold and muddy. For example when photographing streams the best place to be is right in the middle of the stream, I can often be found knee deep in the middle of the stream for several hours, and you end up with numb legs!! But it’s worth it in the end. Fungi shots will often require that you are basically laying on the wet, muddy ground, but a tarp of some sorts can help here.
The below are examples to show the use of foreground compositions, leading lines etc.

4. I personally don’t like this one much, but a lot of people seem to like it because of its strong foreground features with solid leading lines created by the cracks and colours of the rocks which lead the eye towards the crespular rays on the horizon and brightly lit clouds. Tv = ½ second, Av = f/22, ISO = 100.

5. With this one I knew that the water would surge in the little channel at the bottom left, so used this along with the orientation of the rocks to lead the eye towards the white water and the point onto the horizon, so the eye is immediately grabbed by the rocks in the foreground and follows the shore around to the left and then up and to the right through the clouds. Tv = 20 seconds, Av = f/22, ISO = 50.

6. This one is a good example of leading lines used to draw the eye to a central place, the two logs border the photo and the water grabs the attention and all three draw the viewer into the scene. Tv = 10 seconds, Av = f/18, ISO = 50.

7. Streams are generally much harder to find good compositions in when shooting downstream, however the use of good foreground elements and leading lines can help, in this one the white water and rocks grab the attention first and the log and line of the stream create leading lines that the eye can easily flow down the stream, leaving the viewer wondering what may lay around the corner. Tv = 6 seconds, Av = f/18, ISO = 50.
The below are a set of three photos taken in the same spot but with different compositions resulting in one being superior compositionally than the other two.

8. This one has a strong foreground element but the flow of the river just goes off the edge of the photo leaving the viewer lost with nothing really drawing the eye further into the scene. Tv = 45 seconds, Av = f/16, ISO = 50

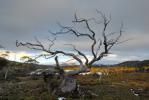
9. This one is much better as it still has a strong foreground element capturing the viewers attention, however the line of the stream continues to draw the viewer further into the photo, where the log directs the eye towards the right and disappears into the distance leaving the viewer wondering what may lay ahead. Tv = 45 seconds, Av = f/16, ISO = 50.

10. This one whilst it has a better leading line in the stream, lacks a strong foreground element and doesn’t immediately draw the view to the foreground to follow the stream through the photos and leaves the eye a little unsure of where to look first, so doesn’t make quite as pleasing composition as the previous photo. Tv = 45 seconds, Av = f/16, ISO = 50.

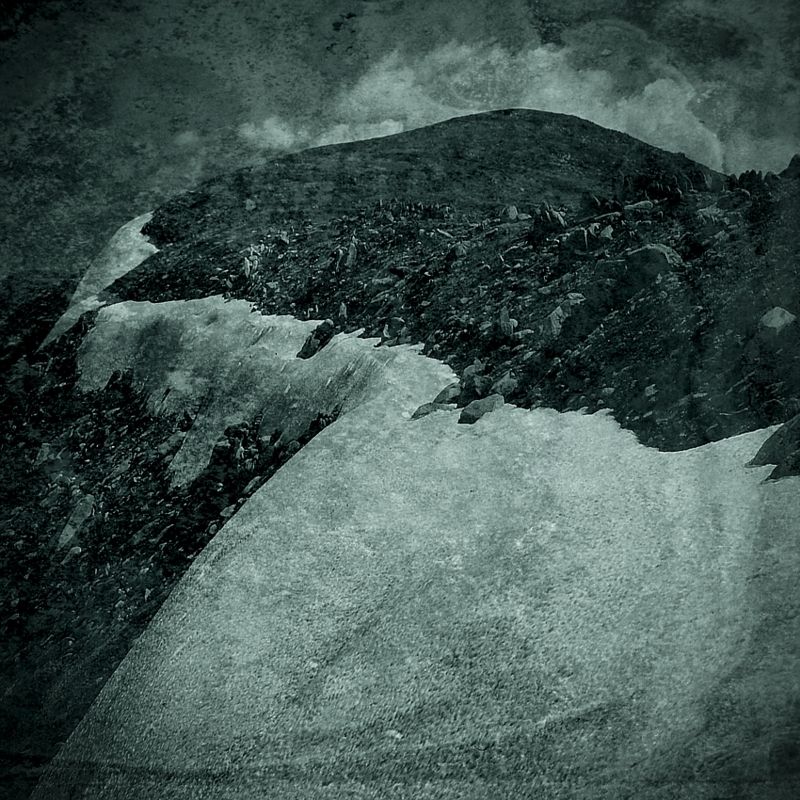
11. A simple composition, yet effective because of the strong lines of the sand ripples drawing the eye through the photo and into the dark stormy looking clouds. Tv = 1/160th of a second, Av = f/16, ISO = 200.

12. This one uses a stronger foreground element with the logs immediately capturing the eye and drawing them out to the right to the illuminated sea mist in the top right corner, with the sand patterns providing good detail along the way. Tv = 1/160th of a second, Av = f/16, ISO = 200.
Long Exposures:
For some reason I have always been drawn to doing long exposures. Long exposures used wisely can add many different emotions to a photo e.g. it can be used to convey a peaceful/clam scene or can be used to accentuate movement e.g. cloud streaks and introduce extra drama to a sky conveying a feeling of movement that a quick shutter speed may not be able to convey as well. Below are some tips specifically related to taking long exposures, with some example photos at the end showing different settings used to achieve certain effects.
- Mirror lockup – if your camera has this feature then it is a good idea to use it (when using a tripod) as it stops “mirror slap” which can in certain circumstances (usually where shutter speeds are about 1-2 seconds) result in the camera vibrating or moving when the shutter is opened up creating some softness in the photo, a good sturdy tripod and soil head can also help reduce things like this.
- If you don’t have a remote switch or cable release, or you’re camera doesn’t have bulb mode, don’t be discouraged as you may still be able to take long exposures (I think most DSLRs will allow up to 30 seconds, and most P&Ss will let you get between 5-15 seconds?) then it is just a matter of switching the drive mode to the timer (well for Canon anyway if your not sure consult your cameras manual which should be able to tell you how to set the timer) setting the timer is like using a remote switch and reduces the chance of vibration cause from you pressing the shutter button, but will not work in bulb mode.
- Some cameras have a long exposure noise reduction feature built in, however, I always make sure this is turned off as noise reduction is best done in post processing and gives you more control over what is done. For example if taking a long exposure there will usually be considerable noise (depending on temperature, ISO and aperture settings) and you will find that if just using the default settings in the noise reduction software often too much detail will be lost e.g. trees are a good example, noise reduction will often result in trees being “smoothed or blurred” with very little detail left, and doing noise reduction in post processing will allow you to select how much noise reduction is done and how it affects the photo, but if letting the camera do it all, it doesn’t know how you want the photos to look and it can end up ruining an otherwise good photo, which cannot be undone.
- Visualisation plays a very important role in getting good long exposure photos as you need to be able to predict what will happen, e.g. where the water will show white from being disturbed and how this will effect the photo, this is where you look for features that will create water disturbance that can be used to create leading lines, this is also dependant on the length of the exposure, this is the same with clouds as well, shooting from different angles to the clouds direction will have very different results (see below examples).
The below photos show the difference that shutter speed and cloud direction can play in creating a mood for the shot with a long exposure. Clouds going straight towards you or away from you often give quite a dramatic feel to the shot, where as clouds travelling at right angles often portray a more serene/calm/soft feel to them.

13. This is what the scene looked like early on with out a very long shutter speed. Tv = 3.2 seconds, Av = f/22, ISO = 100.

14. A bit later when there was less light and a longer shutter speed was used. Tv = 30 seconds, Av= f/22, ISO = 100.

15. Even later with a much longer shutter speed. Tv = 300 seconds, Av = f/22, ISO = 100.
Another couple of examples showing the difference in wind direction can have on the feeling of the photo.

16. The clouds in this one were going either from right to left as opposed to towards or away from me and create a completely different mood form the photos above. Tv = 100 seconds, Av = f/22, ISO = 100.

17. Another one with the clouds moving from right to left creating a different feel to the photo, than cloud coming towards/away from me. Tv = 45 seconds, Av = f/18, ISO = 50.

18. Again with the cloud direction straight towards me, creates a much more dramatic sky then the two above. Tv = 180 seconds, Av = f/22, ISO = 100.

19. Cloud type can also dramatically effect the type of effect you get in a photo, sparse clouds like above will give a more streaky effect than a cloud filled sky as in the below photo. Tv = 120 seconds, Av = f/22, ISO = 100.

20. Same shutter speed as the above and similar cloud directions, but this one had a lot more cloud in the sky. Tv = 120 seconds, Av = f/22, ISO = 100.
Now for some long exposure water examples, as with clouds the use of shutter speed can play an important role in achieving a particular mood or feeling in a photo.

21. Essentially the same photo as the one below, but a shorter shutter speed, giving a completely different feeling than the longer shutter speed. This one blurred the movement of only one wave, giving the water much more definition that the one below. Tv = 2 seconds, Av = f/16, ISO 200.

22. This one had a much longer shutter speed than the one above capturing the movement of many waves crashing on the shore creating a misty effect. Tv = 60 seconds, Av = f/16, ISO = 50.

23. For this one I wanted to show the power of the waves hitting the rock, so that plus the fact that it was sunny meant a much shorter shutter speed was used to show mostly freeze the movement. Tv = 1/100th of a second, Av = f/14, ISO = 200.

24. Now the complete opposite to the above, a very long shutter speed to blur the movement of many surges of water over the rocks, creating a calm/serene feeling. Tv = 100 seconds, Av = f/22, ISO = 100.

25. Now one in-between the above two photos, this one blurred the motion of the water but retained enough detail in the wave to show its power and movement and create some drama. Tv = ¼ of a second, Av = f/22, ISO = 100.
Now for an example using a waterfall, unfortunately I don’t have many short shutter speed waterfall shots so one out of the kayak will have to do.

26. This one due to necessity had a short shutter speed freezing the motion of the water instead of blurring it like in the one below. This shot was able to use a much wider aperture as there was not a large depth of field required to make sure everything was in focus. Tv = 1/60th of a second, Av = f/6.3, ISO = 400.

27. This one used a slower shutter speed to blur the movement of the water and get that silky look, the degree of this effect will depend on the shutter speed used and the amount and speed of the flowing water. Ev = 3.2 seconds, Av = f/22, ISO = 50.
The Environment:
When shooting landscapes it is important as with all types of photography to know your subjects, this only comes from spending time in the field and observing things, as well as practicing taking photos etc. For example some things which are worth considering before heading out to take landscape photos include:
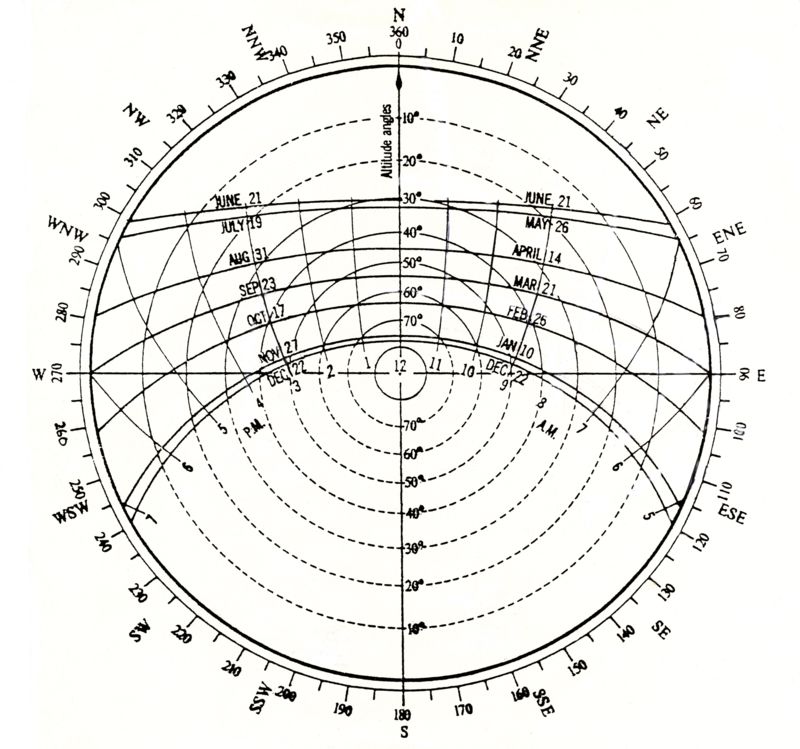
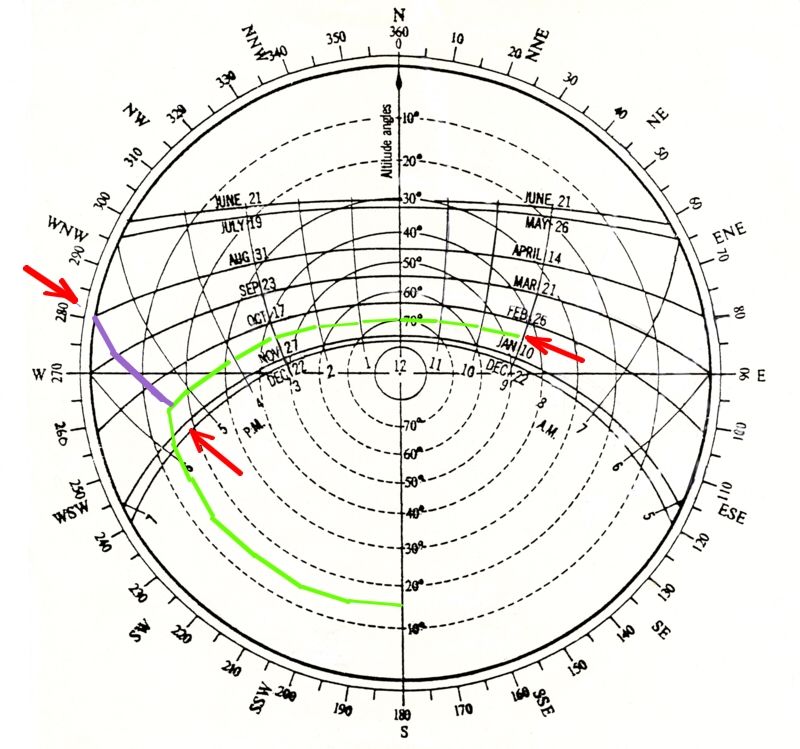
- Knowing when and where the sun will rise or set (this always differs with
location, time of year and altitude).
- If doing seascapes what will the tide be doing? What is the swell doing?
- Will there be a full moon which may help/hinder the photo you are after.
- What sort of light will best help achieve the shot(s) you wanted to take.
As a photographer I tend to note places that would be good in certain conditions where ever I go, so when heading out to take photos, the above points may determine where I go and what sort of photos I try and shoot etc (the weather plays an important role, as often this will determine the types of photos I will try and get e.g. rainy overcast weather will often mean I go to a rainforest or stream) For example, say I wanted to go and shoot seascapes and I head to a really nice area with some good rocks, and I want to get some really misty water in a long exposure, then if the tide is not right or there are no waves this may not be possible and another area may have been better. This is also where scoping a place out during the day (obviously this is not all that relevant to bushwalking, more for local/easily accessible areas) so that you have an idea of what features exist, or I tend to just turn up one or two hours before sunset, but this can’t be done sunrises though.
Its also important not to focus solely on the “big landscapes”, the little things can be fun to look for and to try and photograph and portray different moods, any good portfolio of photos would have a range of photos from the big landscapes to the little fungi, leaves and plants etc.
The “Magic Hour”:
The magic hour as it is often referred to by photographers relates to the times around dusk and dawn, when the light is at a low angle and generally has a good quality about it. Time of day is very important in achieving good photos and the best time is generally 1 hour either side of sunset and sunrise, of course great shots can be taken during the middle of the day, but these are usually in inclement weather situations which add real mood or drama to a photo. This is in part why a lot of good landscape photographers walk solo as they can choose where they stay and can wait for the magic hours to shoot at a specific location. I tend to always be looking at the landscape for features that could make good photos at dawn or dusk and often plan walks to camp at or close to points of interest, I also tend to study the maps to get ideas of where to go and what features could make good photos.
Subject Specific Hints:
A very important aspect of any natural photography i.e. landscapes or wildlife is in knowing your subject, just like a good wildlife photographer learns about the animals they wish to shoot, a landscape photographer must learn about the subjects they wish to shoot, however wildlife is greatly different in that they can move about all over the place, with landscapes its more about knowing how different lighting conditions effect the landscape given differing conditions, I personally love dramatic cloudy conditions and also snow, rain and misty conditions, but then not everyone likes to wander round in the rain and snow and may prefer different aspect/moods the land produces.
Seascapes: I find that the most pleasing results come from finding a good foreground and having a large foreground element, but this is not always the case though depending on the conditions at the time and personal taste. Try to look for features where the water will swirl around, come up and over and drain off and create nice lines or misting such as big pebbles or channels in rocks where the water comes up and drains back out again, or even rocks where waves are crashing into and creating large spray, after a while and some experimenting with different compositions you will get a feel for what things will work and what wont and what elements you like to include in your photos, being able to visualise what the end product will look like plays an important part in long exposure photography, and only practice will be able to give you this visualisation. I find typical shutter speeds for sunset seascapes are usually between ½ second up to about 4-5mins at which point noise and failing light becomes too much of a problem. Often you will start by shooting towards the sun, but as the light is reduced to near darkness you will find your self turning to right angles and away from the sun as light will be reflected off foreground surfaces and still provide reasonable details.
Landscapes: For landscapes the main thing that a long exposure will do is perhaps blur cloud movements, this can create powerful images if used in the right way, the effects will vary greatly depending on the shutter speed, the type of clouds, their position, the speed and direction they are moving in.
Streams/Rivers: The best time for stream and river photography is when it’s overcast and/or raining, I personally wouldn’t bother much unless it was overcast or raining as there will be more water running, the colours tend to be more saturated because all the plants, mosses, lichens and leaf litter are wet and you don’t tend to get blown highlights as easily, but this is not to say you can’t do it in sunny situations, but a set of neutral density filters will be needed if you want to achieve that silky water effect without blowing the highlights.
An essential piece of equipment for this type of photography is a circular polarising filter, this a) means you can have a slightly longer shutter speed as it makes it darker and b) you can cut out unwanted glare off wet rocks, the water surface and foliage (which is usually very distracting), by cutting the glare off the water, you may then also be able to see the bottom or other underwater features depending on the depth, the clearness of the water and how much rough water is there.
Generally try to shoot upstream as this produces the most pleasing results and try to find rocks/logs and sections of rough water that will lead the eye up the stream, again visualisation becomes extremely important, and is something only practice can teach you. Shooting downstream can also produce good results but is generally harder to get good results with pleasing compositions.
Generally typical shutter speeds for streams and rivers will not be much more than 30 seconds (unless using a few neutral density filters) so a cable release/remote switch are not as necessary but still a good idea if you have one.
Filters:
Graduated Neutral Density Filters (GND):
These filters play an extremely important role in landscape photography especially for sunsets and sunrises. GNDs are filters usually rectangular and fit into a filter holder. The filter will have one half dark and the other clear. The idea is to position the filter so that it balances out a bright sky with a dark foreground etc. There are a variety of types such as a hard stop where graduation is very sudden from clear to the given stops dark, a soft stop where it gradually darkens towards the top and a reverse where it is darker in the middle than at the top. Each type has a different use and often multiple filters will need to be used to get the correct exposure.
Hard stop is good for seascapes or where the horizon is usually quite flat and defined;
Soft stop is good for uneven horizons e.g. mountains;
Reverse is good for seascapes where the sun is just coming up over the horizon.
Circular Polarising Filter (CPL):
These are also very handy and used correctly can provide great results, these filters are used mainly to remove reflections or glare off water etc, but they also enhance saturation and can give good results in forest settings. However, CPLs also cut the amount of light by up to approximately 2 stops (however the new HD CPL from Hoya has reduced this, so you can still get the polarising effect but without losing so much light) so a longer shutter speed is needed to expose correctly.
UV Filters:
These can be handy for protecting your lens, some people argue that it doesn’t really protect your lens, but I like to have either a CPL or UV filter on the lens (unless I’m using the GNDs) as I am often getting raindrops or salt spray on the lens and cleaning this off will result in small scratches on the filter over time, which is much better than being on the lens.
Neutral Density Filters:
These filters are used to gain long exposures in conditions that would not normally be possible, e.g. you can get the silky water effect on a stream and make a correct exposure even in bright sunlight, they come in two types, both a screw on type like a CPL/UV filter and also the rectangular type. These can produce interesting effects, but in my opinion these filters are only used when conditions are less than ideal for the photo, and whilst allowing practice of long exposures etc it is better to have the right lighting conditions.
Digital workflow:
I shoot everything in RAW format (uncompressed and retains all detail captured) and not jpeg format (which is compressed and throws away “unwanted” data, basically the camera processes your photo for you), so if you just want to take a photo and not do any post processing then jpeg is fine, but if you want to be able to control each variable of a photo and achieve high quality results then RAW is the format you will want to shoot in (however, you will need to make sure that your software will support that particular type of RAW format), also RAW uses a LOT more memory card space (a typical RAW photo will be around the 20-30mb size, a jpeg about 2-3mb), the downside to using RAW is that you must be prepared to spend at least a couple of minutes on each photo processing them, as an example I would typically spend between 10 and 25mins on each photo, processing in RAW and doing some other stuff in TIFF format, see below for a typical process procedure for my photos.
Once downloaded I open the photos up in a RAW viewer, Canon software comes with Zoombrowser, others I would imagine would be similar or you should be able to download one, as most normal programs will not let you view RAW files. I then go through the photos writing down the photos I think have potential or look good that I want to process.
Once I have been through all the photos I then open them up in Adobe Photoshop CS3 and they open in the RAW window (I think from memory I had to download the RAW add-on for Photoshop to use this I think), this window gives you access to many variables such as white balance, exposure, fill light, black, contrast, saturation, all the individual colour channels, chromatic aberration tools and sharpening etc.
A standard photo would have the above adjusted if needed, all sharpening or noise reduction is turned off as this is done at a later stage, this is also where I fix chromatic aberration (CA) (the brightly coloured lines often seen on edges, usually red, blue, yellow or green) to do this you need to zoom in on an area that had CA at 100% zoom or more and move the sliders you will be able to see the effect it has, usually you will only need to move one slider and should rarely need more than +/-30 to remove the CA.
Once I have processed the photos I wanted, I then save them as 16bit TIFF files, this is because TIFF is a lossless format (so again it doesn’t throw away any unnecessary data, however these are even larger files than the RAW often being 60-70mbs each), and the 16 bit means that colour graduations are finer and less likely to form visible “banding” (where colours change suddenly instead of blending nicely from one to another, often seen in sunsets/rises).
I then go through the TIFF files marking the ones I want to keep and finish off. I then open each one in CS3 and follow a set procedure.
1. I zoom into 100% and check for “dust bunnies” or dots of dust, water etc that can be seen and remove these with the spot healing tool.
2. I then do a curves/levels adjustment if needed.
3. Then I remove noise with the noise ninja plug-in in Photoshop, Neat Image is a free standalone program that works quite well (http://www.neatimage.com/)
4. I then sharpen the image using a high pass sharpening action downloaded from (http://www.atncentral.com/sharpeners.htm) and then downloading “Dave’s sharpening actions” and adding the actions to Photoshop’s action list, you then run this as an action and it will open a new copy of the photo and apply the sharpen, you then adjust the amount in the opacity slider to the required amount (generally shouldn’t be any more than +40), this should also be done at 100% view so as to better judge how it effects the photo, I then flatten the image (or you can leave it unflattened so you can come back later and adjust the sharpness, but this doubles the size of each photo)
5. I then make final adjustments to contrast/levels if needed and save the image as a TIFF still.
6. I then convert it to and 8bit image and save as a jpeg.
7. I repeat for each photo and then once all done open all jpeg files and resize via a Photoshop action to 800 pixels on the longest side (for web viewing etc).
Resources:
Other Photographers:
- Nature Photographers Tasmania - Contains links to most of Tasmania’s top landscape/wilderness photographers - http://www.naturephotographers.net.au/
- Ausphotography forum – a great resource for anything photography related for beginners through to the more advanced photographer - http://www.ausphotography.net.au/
- Dave Nobel – http://www.david-noble.net/
- Geoff Murray – http://www.geoffmurray.com/
- Geoff Wise – http://www.wises.com.au/
- John McLaine – wilderness/landscape photographer - http://photo.net/photodb/member-photos?user_id=382187
- Kah Kit Yoong – landscape photographer and has also written some very informative articles on the use of GND filters - http://www.magichourtravelscapes.com/index.php
- Marc Adamus, probably my most favourite landscape photographer outside of Tasmania, who produces some phenomenal work - http://www.marcadamus.com/
- Michael Walters – http://www.flickr.com/photos/aussiemick/
Technical info – I have never really bothered looking at many websites with technical stuff, so if anyone has some good links to sites with technical explanations of any of the aspects of photography they think is worth adding then post it here. But a search engine like http://www.google.comis your friend here, if there are things you want to know do a search and you will find something, but unfortunately there is also often a lot of useless stuff as well.