BakePacker

Food topics, including recipes.

BakePacker

Postby flatfoot » Wed 05 May, 2010 10:40 pm

The BakePacker that I ordered arrived today. This is a heat exchanger you place in a pot to facilitate steaming or 'baking' of food cooked within bags.

You can find out more on the BakePacker site.

I ordered the BakePacker UltraLight which fits inside a 6 inch pot. I also ordered a lightweight 6-inch non-stick pot to use the BakePacker in.

The BakePacker was supplied with two bags (for cooking food) and a recipe book which includes the instructions for use.

P1000362.jpg
P1000362.jpg (28.58 KiB) Viewed 15818 times
Flat-footed Mainlander
User avatar
flatfoot
Phyllocladus aspleniifolius
 
Posts: 572
Joined: Wed 13 Jan, 2010 9:27 pm
Location: Sydney
Region: New South Wales
Gender: Male

Re: BakePacker

Postby flatfoot » Wed 05 May, 2010 10:41 pm

I also purchased a non-stick cooking pot which is sized perfectly for the BakePacker Ultralight.

P1000363.jpg
P1000363.jpg (20.73 KiB) Viewed 15817 times
Flat-footed Mainlander
User avatar
flatfoot
Phyllocladus aspleniifolius
 
Posts: 572
Joined: Wed 13 Jan, 2010 9:27 pm
Location: Sydney
Region: New South Wales
Gender: Male

Re: BakePacker

Postby flatfoot » Wed 05 May, 2010 10:59 pm

I gave it a test by following the instructions with my own recipe:

P1000381.jpg
P1000381.jpg (20.9 KiB) Viewed 15815 times


The recipe is a mix of pancake mix (the 'just add water' variety) with apple and cranberry.

I chopped the dried apple and reconstituted it with the dried cranberries by covering these ingredients with boiling water and setting aside for 10 minutes.

Meanwhile I added 1 1/2 cups of pancake mix to a ziplock bag. Once the fruit had reconstituted I drained off 3/4 cup of water from the fruit and added this to the bag with the pancake mix. I squelched that for a bit until the dry ingredients were mixed into the water to form a smooth batter. I then drained off the remainder of the water from the fruit and added the fruit to the bag containing the pancake batter.

Now it was ready to put in the put. This involves placing the BakePacker heat-exchanger into the pot and then covering the grid with water. The food mix in the ziplock bag is then carefully arranged on top of the heat-exchanger. The bag needs to be left open but folded over so that boiling water from the bottom of the pot can't seep in.

A lid is placed on the pot and then the water is brought to a 'medium' boil. The pot is left undisturbed for 15 minutes. Once that time is up the pot is removed from the heat and it is allowed to stand for a further 5 minutes (with the lid still on).

This is the result:

P1000389.jpg
P1000389.jpg (25.67 KiB) Viewed 15815 times


I'm happy with the result, however I should have cooked half the quantity.

The glad zip-lock bags that I used were not ideal since the white area and glad logo ended up leaving residue on the inside of the pot. I need to find bags that don't have printed matter. Oven bags might be a good thing to try. Other than this problem, there would have been no washing up.

It seems that it will be a good way for cooking freeze-dried meals without making a mess of the pot.

The cooking process for other foods is basically the same although times may vary.

You can see a range of recipes here to give you an idea of the types of things that can be cooked.
Flat-footed Mainlander
User avatar
flatfoot
Phyllocladus aspleniifolius
 
Posts: 572
Joined: Wed 13 Jan, 2010 9:27 pm
Location: Sydney
Region: New South Wales
Gender: Male

Re: BakePacker

Postby flatfoot » Sat 08 May, 2010 10:13 pm

I've tried cooking scones / damper in the BakePacker and was very pleased with the result.

Since I had trouble with the Glad Bags (see earlier posts) I endeavoured to find ziplock bags that were clean and had no print. I picked up a pack of Hercules large-size ( 22cm x 22cm ) ziplock bags from woolies. It turns out that these are the ideal size for the BakePacker UltraLite that I purchased.

Also from woolies I was able to buy a box of "Country Women's Scone Mix". This is actually made by Laucke Flour (they make many of the bread mixes). The beauty of this mix is that it's of the 'just add water' variety.

IMG_0180.jpg
IMG_0180.jpg (29.86 KiB) Viewed 15765 times


Preparation

I based the quantities on recipes from the booklet that came with the BakePacker. An American biscuit is much like a scone (apparently) so I loosley followed the instructions for the 'Dinner Biscuit'.

The quantities I used are:

  • 1 cup of "Country Women's Scone Mix"
  • 1/4 cup of water

I added the cup of dry mix to the 22cm x 22cm ziplock bag. This is how that looks:

IMG_0172.jpg
IMG_0172.jpg (24 KiB) Viewed 15765 times


I then added the 1/4 cup of water to the bag. I ziplocked the bag closed and then whilst holding it with one hand squeezed and squished the bottom of the bag until the contents were mixed. Once adequately mixed, I then used my thumb and fingers to squeeze the content of the bag to the bottom of the bag. I then gently bumped the bottom of the bag against a horizontal surface to spread out the dough mix into a layer about 1-2cm thick.

IMG_0173.jpg
IMG_0173.jpg (26.14 KiB) Viewed 15765 times


Cover the heat-exchanger with water just over the grid. That's a depth of about 25mm (or 1 inch).

It is then important to cover as much of the heat-exchanger as possible with the bag. Make sure that you DON'T ZIPLOCK the bag. The bag must be open, however you need to fold over the bag so that boiling water does not make it's way into the bag. This is how that looks:

IMG_0175.jpg
IMG_0175.jpg (26.9 KiB) Viewed 15765 times


With the lid on the pot and the stove on high heat I brought the water to boil. Once the water was boiling (I had to lift the lid to check), I dropped the heat to a medium boil and allowed the content to cook covered for 11minutes. Once that time had elapsed I turned off the heat and allowed the pot to stand covered for 3 minutes.

Results

I lifted the bag out of the pot and carefully emptied the content onto the plate. On a bushwalk you could cut it in the bag to save mess.

I was delighted with the result.

IMG_0176.jpg
IMG_0176.jpg (19.88 KiB) Viewed 15765 times


Look how light and fluffy it is! (see next post)

The only difference between that and a scone is the shape (and it doesn't have a crust). Other than that the result is great!

I could have actually cooked it for a minute or two longer (or spread out the bag more in the BakePacker) as it was just a little undercooked, but it's perfectly okay for a first try.

Since I had some cranberry sauce at home I tried the scone with that (and a cup of tea). Perfect! It would go equally well with jam from a tube. For the aussie classic golden syrup would be great as well.

You could make savoury variations by adding ingredients like onion flakes, Parmesan cheese, chives, herbs, etc.

One thing I think would work is that you could make half the quantity of scone mix in a bag, whilst along-side it in a second bag heating a freeze-dried stew.

The BakePacker was created based on techniques developed as a means for American G.I.'s to reheat prepared foods in winter conditions.

BakePacker actually suggest that you can use the BakePacker to stretch the food dollar. You can extend the quantity of a freeze-dried meal simply by adding pasta or rice.

Since very little water is evaporated out of the pot during the cooking process, you can reuse this (now hot) water for other purposes such as washing any dishes.
Last edited by flatfoot on Sat 08 May, 2010 10:31 pm, edited 1 time in total.
Flat-footed Mainlander
User avatar
flatfoot
Phyllocladus aspleniifolius
 
Posts: 572
Joined: Wed 13 Jan, 2010 9:27 pm
Location: Sydney
Region: New South Wales
Gender: Male

Re: BakePacker

Postby flatfoot » Sat 08 May, 2010 10:19 pm

flatfoot wrote:Look how light and fluffy it is! (see next post)


I exceeded the attachment limit in the above post. Here's the missing photo:

IMG_0177.jpg
IMG_0177.jpg (21.05 KiB) Viewed 15762 times
Flat-footed Mainlander
User avatar
flatfoot
Phyllocladus aspleniifolius
 
Posts: 572
Joined: Wed 13 Jan, 2010 9:27 pm
Location: Sydney
Region: New South Wales
Gender: Male

Re: BakePacker

Postby Macca81 » Sun 09 May, 2010 12:08 pm

flatfoot wrote:BakePacker actually suggest that you can use the BakePacker to stretch the food dollar. You can extend the quantity of a freeze-dried meal simply by adding pasta or rice.


what? how? you can add pasta or rice to any normal freeze dried meal anyway, without using the BakePaker... isnt the idea of this just to create a more even heat within the pot?


also, what happens if you do cook it with the ziplock bag closed? i cant see it making much of a difference... can you cook something with it closed and take some pics for us?
geoskid wrote:nothing but the best of several brands will do :)
User avatar
Macca81
Auctorita modica
Auctorita modica
 
Posts: 645
Joined: Wed 08 Apr, 2009 3:02 pm
Location: Hobart, Tasmania
ASSOCIATED ORGANISATIONS: Herbalife
Region: Tasmania
Gender: Male

Re: BakePacker

Postby flatfoot » Sun 09 May, 2010 1:05 pm

Macca81 wrote:
flatfoot wrote:BakePacker actually suggest that you can use the BakePacker to stretch the food dollar. You can extend the quantity of a freeze-dried meal simply by adding pasta or rice.


what? how? you can add pasta or rice to any normal freeze dried meal anyway, without using the BakePaker... isnt the idea of this just to create a more even heat within the pot?


I'm aware you can do that with any freeze-dried meal without using the BakePacker. I think the main advantage is that you can heat the food quite effectively with the BakePacker without making a mess of a pot. They suggest 10 minutes of heating time and then 5 minutes for the food to stand in the covered pot.

Macca81 wrote:also, what happens if you do cook it with the ziplock bag closed? i cant see it making much of a difference... can you cook something with it closed and take some pics for us?


I'm not sure. They just make it quite clear in the instructions that you should not ziplock the bag. I've sent them an e-mail to ask some questions. Once I get an answer I'll post an update.

It will take me a few days to munch through the first batch (I'm in weightloss mode at the moment). I'll do some more trials - perhaps with a savoury mix next time. I'll also try heating a freeze-dried meal at the same time as cooking a smaller portion of the scone mix.
Flat-footed Mainlander
User avatar
flatfoot
Phyllocladus aspleniifolius
 
Posts: 572
Joined: Wed 13 Jan, 2010 9:27 pm
Location: Sydney
Region: New South Wales
Gender: Male

Re: BakePacker

Postby flatfoot » Mon 10 May, 2010 9:46 pm

flatfoot wrote:
Macca81 wrote:also, what happens if you do cook it with the ziplock bag closed? i cant see it making much of a difference... can you cook something with it closed and take some pics for us?


I'm not sure. They just make it quite clear in the instructions that you should not ziplock the bag. I've sent them an e-mail to ask some questions. Once I get an answer I'll post an update.


I've received an answer. Unsurprisingly they say that the bag could burst if it is ziplocked closed due to the air expanding. They said that you could experiment with vacating the air from the bag but would need to make sure that the bag is not completely filled with food. I'm quite happy with the results I have been getting based on their recommended techniques.
Flat-footed Mainlander
User avatar
flatfoot
Phyllocladus aspleniifolius
 
Posts: 572
Joined: Wed 13 Jan, 2010 9:27 pm
Location: Sydney
Region: New South Wales
Gender: Male

Re: BakePacker

Postby Macca81 » Tue 11 May, 2010 10:08 pm

ahh... they are catering for the dumb people out there! i understand now :D :P
geoskid wrote:nothing but the best of several brands will do :)
User avatar
Macca81
Auctorita modica
Auctorita modica
 
Posts: 645
Joined: Wed 08 Apr, 2009 3:02 pm
Location: Hobart, Tasmania
ASSOCIATED ORGANISATIONS: Herbalife
Region: Tasmania
Gender: Male

Re: BakePacker

Postby Macca81 » Tue 11 May, 2010 10:09 pm

Macca81 wrote:ahh... they are catering for the dumb people out there! i understand now :D :P


kinda like the "not to be used in the shower" label on the hairdryer ;)
geoskid wrote:nothing but the best of several brands will do :)
User avatar
Macca81
Auctorita modica
Auctorita modica
 
Posts: 645
Joined: Wed 08 Apr, 2009 3:02 pm
Location: Hobart, Tasmania
ASSOCIATED ORGANISATIONS: Herbalife
Region: Tasmania
Gender: Male

Re: BakePacker

Postby flatfoot » Tue 18 May, 2010 8:28 pm

I had the chance to try another basic dish cooked in the BakePacker. This time I tried a Butterscotch self-saucing pudding from one of those boxed packet mixes. i.e. this one:

IMG_0183.jpg
IMG_0183.jpg (24.27 KiB) Viewed 15603 times


The box indicates that this package could serve 6. I decided to cook half of the packet since this should be sufficient for two and is a better quantity for cooking in the bakepacker. Whilst the recipe on the box calls for an egg, I dispensed with that and decided to just use 1/4 cup of water.

I separated the dry batter mix into two equal portions and put one half in a 22cm x 22cm ziplock bag. I then added 1/4 cup of water to the bag and squelched the bag until the batter was thoroughly mixed.

I took 1/2 of the sauce powder and mixed that in a cup with 2/3 cup of boiling water. This was to ensure that the powder would thoroughly dissolve into the water. Once dissolved I then tipped the sauce into the ziplock bag over the top of the batter.

I carefully placed the bag into the BakePacker and folder the top over (without ziplocking the bag). I put the BakePacker on the stove and once the water in the heat-exchanger was boiling I dropped it down to a medium boil and let it cook for 13 minutes. After turning off the heat I let it stand for a minute or so.

The attached photos show the final result:
IMG_0181.jpg
IMG_0181.jpg (28.04 KiB) Viewed 15603 times

IMG_0182.jpg
IMG_0182.jpg (24.09 KiB) Viewed 15603 times


It tasted great and had a nice cakey/pudding consistency. The sauce was sufficiently thick. A great belly-warming dish! :mrgreen:

The cooked quantity was sufficient for two servings. The other bonus is no messy pot to wash and the left-over water in the pot is sufficient for washing your plate and spoon.
Flat-footed Mainlander
User avatar
flatfoot
Phyllocladus aspleniifolius
 
Posts: 572
Joined: Wed 13 Jan, 2010 9:27 pm
Location: Sydney
Region: New South Wales
Gender: Male

Re: BakePacker

Postby flatfoot » Sun 23 May, 2010 12:07 am

I decided to try a dinner cooked in the BakePacker. For this I purchased a freeze-dried meal. I picked up a Chefsway Lamb and Winter Vegetables (single serve, 100g) dehydrated meal.

I split the meal into two separate portions - one for cooking now and the other stored in a ziplock bag for another day. Since the meal was designed as a single serve I decided to add some angel-hair pasta to increase the quantity of food and make the meal more economical. You can buy angel hair pasta in a bag containing pieces approximately 25mm (1 inch) long. This is more convenient for cooking in a ziplock bag.

In a ziplock bag we have the following ingredients:
- 50 grams of the freeze-dried meal
- approximately 2/3 a cup of angel-hair pasta

I then added water to the bag to just cover the dry ingredients.

I also decided to cook a savoury damper mix. I placed the following into a 1/2-cup measuring cup:
- 2 teaspoons of parmesan cheese
- 1 teaspoon of onion flakes
- 1 teaspoon of mixed herbs

I then filled the remainder of the measuring cup with 1/2 a cup of the scone mix used for previous bakepacker trials. I placed this 1/2 cup of dry ingredients in a ziplock bag. I zipped it closed and shook the bag to thoroughly mix the dry ingredients. I then opened the bag and added 1/8th of a cup of water.

I carefully squelched the bag to mix the water with the dry mix and form a dough.

After covering the heat-exchanger grid with water, I carefully arranged the two bags in the BakePacker. I also checked there was sufficient water covering the pasta and dehydrated meal. This is how the two bags look arranged in the BakePacker:

IMG_0186.jpg
IMG_0186.jpg (29.78 KiB) Viewed 15562 times


The top of the ziplock bags need to be folded over a couple of times to prevent additional water seeping into the bags.

I then put the lid on the pot and placed it on the stove. Once boiling, I dropped the temperature to support a medium boil and I then set a timer (on my iPhone) for 12 minutes. Don't peek during cooking. Once the timer sounded I switched off the gas and left the pot to stand undisturbed for another 5 minutes.

On a hike I would eat this from the bags to minimise washing up. For this test I tipped the cooked food into a plate for the purpose of this photo:

IMG_0189.jpg
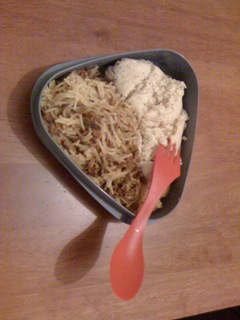
IMG_0189.jpg (28 KiB) Viewed 15562 times


The lamb and vegetable pasta was piping hot and thoroughly cooked and rehydrated. The texture of the savoury damper was similar to the scones I made (see earlier post).

This meal is quick and convenient and the total weight of the ingredients (excluding the water) necessary for one person would weigh no more than approximately 300grams.

If you were cooking for two, I think you could use the smaller sandwich-sized ziplock bags to prepare two portions of damper mix. In the larger ziplock bag you could place sufficient pasta and dehydrated ingredients for two people. The 3 bags should comfortably fit into the BakePacker if you expel the excess air from the bags before folding the tops over.

As another test I decided to cook a carrot cake mix. The boxed-mix I purchased was a carrot and walnut cake mix.

There was enough dry-mix to separate the mix into 3 x 1-cup sized portions. The last portion was a little under 1 cup so I topped up that last portion with some self-raising flour. These portions were each put into separate ziplock bags. I also evenly divided the walnuts between the 3 ziplock bags. I expelled the air from two of the ziplock bags and then put these in an airtight container for future use.

I added approximately 1/2 cup of water to the dry cake mix in the ziplock bag. I then carefully squelched the bag to thoroughly mix the dry ingredients with the water. After ensuring I had water covering the heat-exchanger I carefully arranged the bag in the BakePacker so that as much of the grid was covered by the bag as possible. I also ensure the mix was spread in an even layer in the base of the bag.

I cooked the cake for 10 minutes and left it to stand for 2 minutes.

To remove the cake from the bag, I tore the sides of the bag at the seems. This made it easier to place a plate over the cake and flip it over to remove the bag.

This is the result:

IMG_0191.jpg
IMG_0191.jpg (27.27 KiB) Viewed 15562 times


The cake could have done with an extra couple of minutes of cooking since the center was only partially cooked (it was just a little too moist). The cooked cake was approximately 25mm (1 inch thick).

I tried to make a water-based frosting mix from the supplied ingredients. This is designed for use with butter and the result was more a glaze - perhaps because I added too much water. I think it would be easier and less-problematic to just sprinkle some icing sugar on the cooled cake.

There was sufficient quantity to divide the cake into four small pieces. You'd have a couple of pieces to share for supper and a couple of pieces to eat during for morning tea on the next day.
Flat-footed Mainlander
User avatar
flatfoot
Phyllocladus aspleniifolius
 
Posts: 572
Joined: Wed 13 Jan, 2010 9:27 pm
Location: Sydney
Region: New South Wales
Gender: Male

Re: BakePacker

Postby jose » Sun 23 May, 2010 9:56 pm

Thank you Flatfoot, I am enjoying your experimental baking reports. It all seems to be turning out reasonably well. Scone and cakes would be quite a treat on long walks where I tend to take dry crackers and crispbreads to save weight. Thanks for including all the pictures as well. I think I'll have a go using a trivet in my cooker - you have inspired me.
jose
Athrotaxis cupressoides
 
Posts: 104
Joined: Wed 03 Sep, 2008 9:55 pm
Region: Tasmania

Re: BakePacker

Postby flatfoot » Sun 23 May, 2010 10:22 pm

From my experiments I think its easier to get better results for scones. Maybe the carrot cake mix just needed more cooking time. I will also try other simpler cake mixes. It's important to experiment at home. There would be nothing worse than getting a bad result when you are hungry.

I'm now keen to get myself a food dehydrator.

If you are using a trivet, you'll need to do some experiments to get the cooking time right. Once you work out some basic rules of thumb, you shouldn't go too wrong. You also need to add cooking time at higher altitudes.
Flat-footed Mainlander
User avatar
flatfoot
Phyllocladus aspleniifolius
 
Posts: 572
Joined: Wed 13 Jan, 2010 9:27 pm
Location: Sydney
Region: New South Wales
Gender: Male

Re: BakePacker

Postby jose » Sun 23 May, 2010 10:29 pm

Yes, I hadn't thought about the need to lengthen the time for higher altitudes yet! I dehydrate food in my oven and it works well for me. I keep a productive vegetable garden and dry my vegetables separately at between 50 - 60degrees with a towel in the door to keep it slightly ajar for the moisture to escape and it takes about the same time as a dehydrator.
jose
Athrotaxis cupressoides
 
Posts: 104
Joined: Wed 03 Sep, 2008 9:55 pm
Region: Tasmania

Re: BakePacker

Postby ninjapuppet » Thu 03 Jun, 2010 10:23 pm

sorry if i missed it, but what is the weight of this setup?
User avatar
ninjapuppet
Athrotaxis selaginoides
 
Posts: 1277
Joined: Mon 09 Nov, 2009 11:33 pm
Region: New Zealand
Gender: Male

Re: BakePacker

Postby flatfoot » Thu 03 Jun, 2010 10:40 pm

The weight of the 6-inch pot is 7.3 ounces (207 grams).

The weight of the grid is 4 ounces (114 grams)

Total weight around 321 grams.
Flat-footed Mainlander
User avatar
flatfoot
Phyllocladus aspleniifolius
 
Posts: 572
Joined: Wed 13 Jan, 2010 9:27 pm
Location: Sydney
Region: New South Wales
Gender: Male

Re: BakePacker

Postby ninjapuppet » Fri 04 Jun, 2010 12:59 am

I think this is the lightest setup I have come across to bake something.

I initially saw a similar one from another company, but I had 2 concerns:

1) is there any chance of the "non stick" layers at the top of your pot peeling off?
2) do you sometimes get food a little soggy? just like how condensation builds up inside the bag?
User avatar
ninjapuppet
Athrotaxis selaginoides
 
Posts: 1277
Joined: Mon 09 Nov, 2009 11:33 pm
Region: New Zealand
Gender: Male

Re: BakePacker

Postby flatfoot » Fri 04 Jun, 2010 1:07 am

You do sometimes get soggy results - particularly if you undercook things. i.e. not enough cooking time. Cakes and scones turn out okay after practice as discussed above. The great thing about this setup is that you can also use it for efficiently (and effectively) heating typical bushwalking meals.

I'd like to see the version from another company that you saw.

The ultralight version that I have is big enough (just) for cooking for 2.

I don't think the non-stick layers will peel off. You can get a pot without the non-stick if you think that is a concern.
Flat-footed Mainlander
User avatar
flatfoot
Phyllocladus aspleniifolius
 
Posts: 572
Joined: Wed 13 Jan, 2010 9:27 pm
Location: Sydney
Region: New South Wales
Gender: Male

Re: BakePacker

Postby flatfoot » Wed 22 Sep, 2010 8:45 pm

I confess to having disastrous results trying to use these techniques on an overnighter. The result was a plastic-infused inedible main meal ( a pasta-based meat dish ). My dinner that night was a lump of damper followed by a toblerone. That was not satisfying after a long and exhausting day on the track.

I'm going for the keep-it simple approach from now on.
Flat-footed Mainlander
User avatar
flatfoot
Phyllocladus aspleniifolius
 
Posts: 572
Joined: Wed 13 Jan, 2010 9:27 pm
Location: Sydney
Region: New South Wales
Gender: Male

Re: BakePacker

Postby rowan » Thu 23 Sep, 2010 3:40 pm

You should always use baking bags to cook in like this. Zip-locks are not made out of heatproof plastic and quickly leech chemicals as well as having a low melting point. There are so many cook-in-the-bag recipes on the net now that Glad even made a point on their website (not sure if it still there) that ziplocks should not be used for cooking/boiling in.
rowan
Nothofagus gunnii
Nothofagus gunnii
 
Posts: 25
Joined: Sun 06 Jun, 2010 7:06 pm
Location: SW Victoria
Region: Victoria
Gender: Female

Re: BakePacker

Postby flatfoot » Thu 23 Sep, 2010 7:36 pm

rowan wrote:You should always use baking bags to cook in like this. Zip-locks are not made out of heatproof plastic and quickly leech chemicals as well as having a low melting point. There are so many cook-in-the-bag recipes on the net now that Glad even made a point on their website (not sure if it still there) that ziplocks should not be used for cooking/boiling in.


Thanks for the info ... I might give it another go.
Flat-footed Mainlander
User avatar
flatfoot
Phyllocladus aspleniifolius
 
Posts: 572
Joined: Wed 13 Jan, 2010 9:27 pm
Location: Sydney
Region: New South Wales
Gender: Male

Re: BakePacker

Postby Charlievee » Sat 25 Sep, 2010 6:54 pm

Hey flatfoot ; Ive had some luck doing cakes and scones, but without a bakepacker and I get crusty results ! Many US sites revel in the bakepacker, but if it's not a crusty result I'm not interested. I used a small pot inside of a larger pot (both with lids) and put some small pebbles in the larger one to keep it off the heat on the bottom ; ie - the heat gets all around the pot you're baking in. It takes about 40 - 45 mins for an average small size cake or similar to cook - pretty fuel thirsty (even with stove down low) so on a fire it might be better, but it is doable. I've also done a savoury damper in a titanium pot on my whisperlite, but it took quite a bit of fiddling to get the heat low enough (and the results were a bit burnt !). Again, doable. Maybe better in an anodised pot that works better than the titanium. As you guys have stated, experience at home is invaluable. Regards, CV
A man's best friend is his knife, not his dog...
User avatar
Charlievee
Athrotaxis cupressoides
 
Posts: 107
Joined: Sun 29 Aug, 2010 8:51 pm
Region: Victoria


Return to Bush Tucker

Who is online

Users browsing this forum: No registered users and 8 guests